 Chapter 8
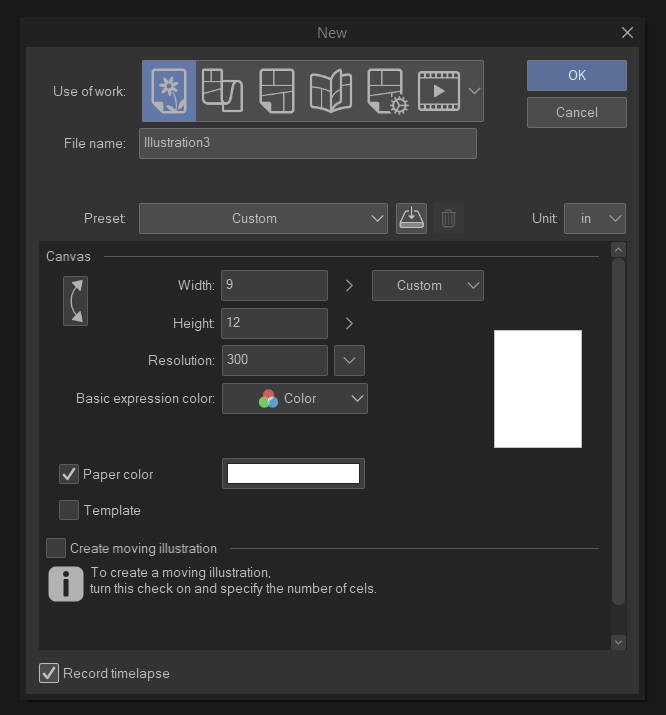 Right-click and open in another window to see the images larger.
To begin with, this is what you see when you start a new project. Now, each of those icons is a different type of work. The first is for random images and the others are for comics, book layouts, and animation. We’re going with art right now because everything I post from here on can be used under any type of work.
When you create your file, you are offered presets or custom sizes. Letter and A4 are good places to start. They’re self-explanatory. That is the physical dimensions of your canvas. Where people often have a problem is with the Resolution. Commonly, internet resolutions are 72 dpi or 99 PPI. DPI = DOTS per inch as printed by a printer and PPI=PIXELS per inch is the number of pixels as displayed by a computer screen. This is just so you know what the terms mean. 72 DPI is FINE for uploading to the internet, but printing it looks awful. You want 300 DPI minimum for digital art. So make sure your resolution is set to 300 per the example. Choose whatever physical size you want.
Using a higher DPI like 600 is often done for lineart/black and white work, however, using it for color will tax your system resources.
Continue reading “Coloring Tutorial – Part 1 – Inking”
Right-click and open in another window to see the images larger.
To begin with, this is what you see when you start a new project. Now, each of those icons is a different type of work. The first is for random images and the others are for comics, book layouts, and animation. We’re going with art right now because everything I post from here on can be used under any type of work.
When you create your file, you are offered presets or custom sizes. Letter and A4 are good places to start. They’re self-explanatory. That is the physical dimensions of your canvas. Where people often have a problem is with the Resolution. Commonly, internet resolutions are 72 dpi or 99 PPI. DPI = DOTS per inch as printed by a printer and PPI=PIXELS per inch is the number of pixels as displayed by a computer screen. This is just so you know what the terms mean. 72 DPI is FINE for uploading to the internet, but printing it looks awful. You want 300 DPI minimum for digital art. So make sure your resolution is set to 300 per the example. Choose whatever physical size you want.
Using a higher DPI like 600 is often done for lineart/black and white work, however, using it for color will tax your system resources.
Continue reading “Coloring Tutorial – Part 1 – Inking” 
Swipe
Latest Comics
Coloring Tutorial – Part 1 – Inking
I was commissioned to do an in-depth tutorial covering file setup, inking, and coloring as though I am talking to an absolute beginner so here it is! (Because I’ve been waiting for hours for CSP to redownload all the content and I know I won’t finish my updates this week.)
Right-click and open in another window to see the images larger.
To begin with, this is what you see when you start a new project. Now, each of those icons is a different type of work. The first is for random images and the others are for comics, book layouts, and animation. We’re going with art right now because everything I post from here on can be used under any type of work.
When you create your file, you are offered presets or custom sizes. Letter and A4 are good places to start. They’re self-explanatory. That is the physical dimensions of your canvas. Where people often have a problem is with the Resolution. Commonly, internet resolutions are 72 dpi or 99 PPI. DPI = DOTS per inch as printed by a printer and PPI=PIXELS per inch is the number of pixels as displayed by a computer screen. This is just so you know what the terms mean. 72 DPI is FINE for uploading to the internet, but printing it looks awful. You want 300 DPI minimum for digital art. So make sure your resolution is set to 300 per the example. Choose whatever physical size you want.
Using a higher DPI like 600 is often done for lineart/black and white work, however, using it for color will tax your system resources.
Continue reading “Coloring Tutorial – Part 1 – Inking”
Right-click and open in another window to see the images larger.
To begin with, this is what you see when you start a new project. Now, each of those icons is a different type of work. The first is for random images and the others are for comics, book layouts, and animation. We’re going with art right now because everything I post from here on can be used under any type of work.
When you create your file, you are offered presets or custom sizes. Letter and A4 are good places to start. They’re self-explanatory. That is the physical dimensions of your canvas. Where people often have a problem is with the Resolution. Commonly, internet resolutions are 72 dpi or 99 PPI. DPI = DOTS per inch as printed by a printer and PPI=PIXELS per inch is the number of pixels as displayed by a computer screen. This is just so you know what the terms mean. 72 DPI is FINE for uploading to the internet, but printing it looks awful. You want 300 DPI minimum for digital art. So make sure your resolution is set to 300 per the example. Choose whatever physical size you want.
Using a higher DPI like 600 is often done for lineart/black and white work, however, using it for color will tax your system resources.
Continue reading “Coloring Tutorial – Part 1 – Inking” Inktober Art Dump
I chose to do art from the stories I’ve been writing so thought I’d post these here for your entertainment. Next… two story posts.
– Tiff